 Mueen Studio
Stand-up pouches are everywhere: coffee, snacks, supplements, pet treats, bath salts. They’re light, cheap to ship and give you a big printable billboard. But a pouch isn’t a flat box. It curves, it’s heat-sealed on several sides, it has a zipper and a gusset, and it’s printed on film rather than board. Here are the ten rules I follow on every pouch and Mylar bag project.
1. Start with your converter’s template
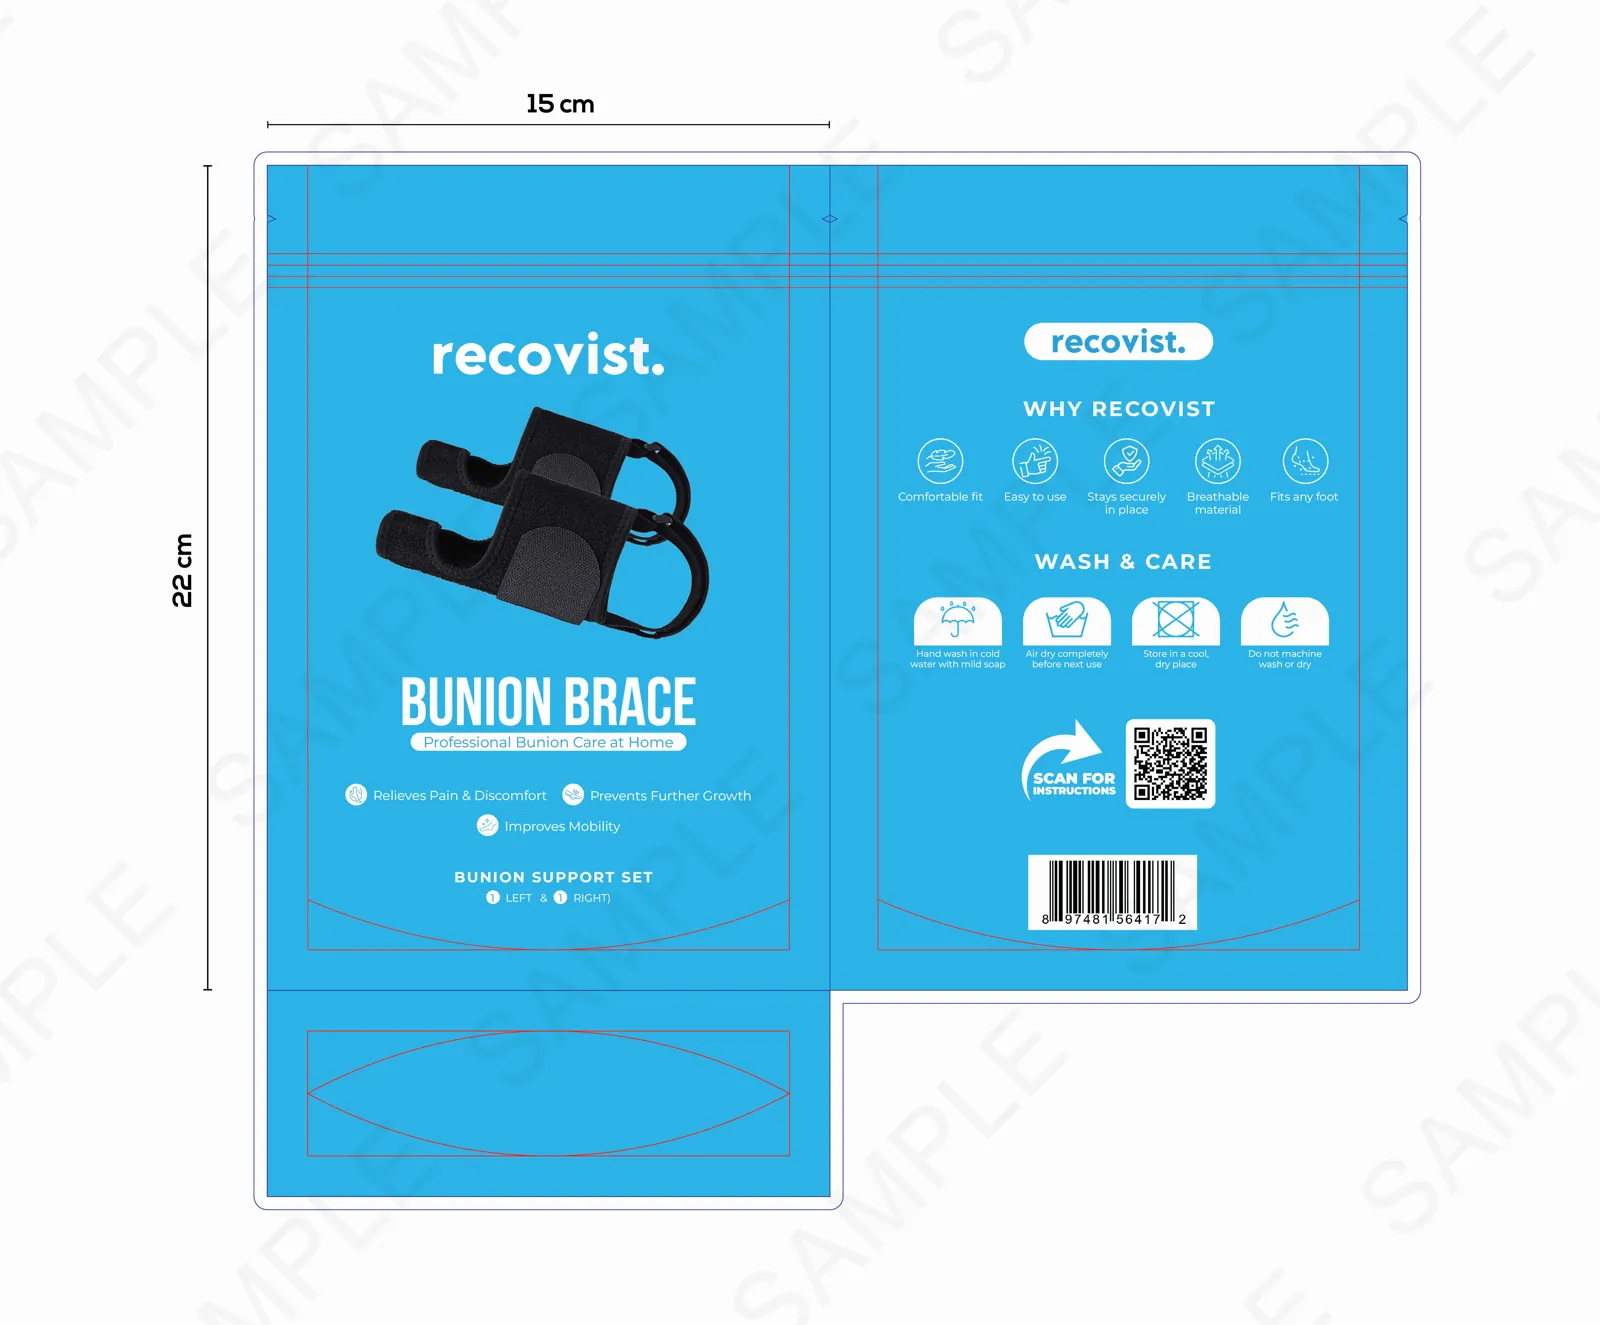
The converter is the company that prints and makes the pouches. Before any design, ask them for the template for your exact pouch size and style. It shows the finished size, seal areas, zipper position, tear notches, gusset, hang hole and bleed. Designing on a generic mock-up and fitting it to the template later almost always means redesigning.
2. Keep the seal areas clear of anything important
The edges and the bottom of a pouch are heat-sealed, and the seal area distorts and hides what’s printed there. Keep logos, text and barcodes out of the seals and away from the edges. Run background colour and pattern through the seals to the bleed, but nothing that has to be read.
3. Respect the zipper and tear notch
Resealable pouches have a zipper a short distance below the top seal and a tear notch above it. That band is often crushed or folded on the shelf. Don’t put the product name or a key claim across it, and check the tear notch doesn’t cut through your logo.
4. Design the top two-thirds for the shelf
A filled pouch bulges in the middle and curves at the edges, and on a shelf the bottom is often hidden behind a price rail or another product. Put the brand, product name and variant in the upper part of the front panel, where they stay flat and visible. Use the lower area for supporting claims, weight and certification marks.
5. Remember the gusset
The bottom gusset is the fold that lets the pouch stand. Once filled, it sits underneath the pouch and is barely visible from the front. Extend the background colour onto it, but don’t place anything there that needs to be seen. Some brands use it for a pattern or a short message seen when the pouch is picked up.
6. Plan windows with the product in mind
A clear window lets the product sell itself, which works for granola, nuts, pet treats and bath products. Place it where the product actually settles once filled, usually the middle or lower front, not where the air gap sits at the top. Make sure your product looks good when it’s been shaken in transit.
7. Use a white ink layer on clear and metallic films
Pouches are printed on film, not white board. On clear or metallised film, colours print transparent unless there’s a white ink layer underneath. Decide where white goes, under every colour for full opacity or only in some areas to let the metallic shine through, and prepare it as a separate layer. On Mylar bags this choice is most of the design.
8. Choose finishes that survive handling
Matte lamination feels premium and hides scuffs; gloss makes colours pop. A spot finish, such as a gloss logo on a matte bag, adds contrast without a second material. Each finish needs its own layer on the template, matched to your converter’s specification.
9. Build a system for flavours and sizes
Most pouch brands sell several flavours or sizes. Design one layout where the colour, flavour name and illustration change while everything else stays fixed. Shoppers find their flavour faster, and adding the next SKU takes days, not weeks.
The same thinking applies to sachets and stick packs. In the Timeless Radiance case study, a 70 × 100 mm sachet carries the logo, name, tagline and colour system of its 30-sachet carton, simplified for a single serving. The front holds batch and best-before fields, and the back’s ingredients and usage match the box exactly.
10. Ask how it will be printed
Digital printing suits short runs and many SKUs and needs no printing plates. Rotogravure and flexographic printing use a cylinder or plate per colour, so they cost more to set up but less per pouch at volume. The method affects how many colours you can use, how fine your details can be, and whether spot colours are worth it. Ask the converter before the artwork is final.
Need a pouch designed on your converter’s template? See formats and examples on the stand-up pouch and Mylar bag design page. Pouch design is $200–250 and usually takes 3 to 7 days including revisions.
Pre-press checklist for pouch files
- Artwork built on the converter’s template, at 100% scale
- Bleed extended past the cut line as specified
- No critical text or barcodes in seal areas, zipper band or gusset
- White ink and finish layers set up as separate, named layers
- Text converted to outlines; images at full resolution
- Colours in CMYK or the specified spot colours
- Barcode tested and placed on a flat area of the back
- Print-ready PDF plus the editable Illustrator file